Getting started
To make it easier for you to get an overview over the many functionalities of advatra we have created a getting started guide for you.
Create your account
Welcome to advatra!
To set up your account, you need your invitation email, that you received earlier. If not, ask your administrator to create an account for you.
In the invitation email, click on the link to set a password. You will then be redirected to advatra. Enter a desired password and confirm.
You can now log in into advatra with your business email and your newly created password!
Validity
Your invitation is only valid 24 hours after creation.
If your invitation is not valid any more, you have to request a new one. Click on the "Did you forget your password?" hint on the login screen. Enter your business email address and confirm.
You will now receive a second invitation email, with a new validity of 24 hours.
Where to start?
Welcome to advatra! In advatra you have an CRM part and an Administration part. In the CRM you will do your daily work. The administration is very useful while setting up advatra to your team needs.
To start, it is also great to have a look at the following videos:
Products and their structure
Pricing functionality
To-dos (Operational work)
Dig deeper
To dig deeper in the advatra data structure, we recommend these help articles:
CRM

Companies
Companies are all types of companies (often B2B customers), except suppliers. Before you create a new company, the following information must be stored in the system: Company type and departments.
Create a company
-
Field one "First Name": If it has an official company name, just leave the first field open and enter the company name in the next field.
-
Field two "Name/Company": If it does not have an official company name, just enter first name in field one and family name in field two.
Create a location for the company
-
Locations: you can create multiple locations for one company and manage it here. When you create dossiers (projects) and documents later, they will be subordinated to the locations.
Create a contact for the company
-
Contacts: Here you create contacts that belong to this company. The best thing to do first is to create a travel agent with all the contact details.
Now you have created the basis for creating a trip. For this purpose, a dossier can be created under Company → Location → Contact → Your dossier, which summarizes all documents and information on a trip.
Create a dossier
- Opening date: On which day the dossier is opened.
- Travel Advisor: Which Travel Advisor is responsible on the Travel Agency side.
- Employee: Which employee is responsible for designing and managing the trip and the dossier in general?
- Responsible employee operations: In large DMCs, the administrative work is distinguished from the work of the travel designer (assembles the trip).
Note: If you wish, we can also automate the data import. Please contact us for this. All other options are not to be filled in at the moment.

Suppliers
Suppliers are service providers for your products. A product (product template and subproduct) can be assigned to only one supplier, but each supplier can be assigned to an unlimited number of products.
- If you create a main product with a supplier, this supplier will automatically be used for the subproduct as well.
- If you create a main product without a supplier, you can assign a separate supplier to each subproduct.
Create a supplier
- First name
If it has an official company name, just leave the first field open and enter the company name in the next field. - Name/Company
If it does not have an official company name, just enter first name in field one and family name in field two. Continue and fill in all mandatory fields. Congratulations, now you created a new supplier. - Type
Different types can be created under Administration → Administration → General → Company types. - Departments
Departments can be created under Administration → Administration → General → Departments. - Locations
You can create multiple locations for one supplier and manage it here. When you create dossiers (projects) and documents later, they will be subordinated to the locations. - Contacts
Here you create contacts that belong to this supplier.
Note: If you wish, we can also automate the data import. Please contact us for this. All other options are not to be filled in at the moment.

Contacts
Here you get an overview about all your contacts and the function to edit. Contacts can be created for a company or for a supplier.
Create contacts
- Click on Companies or Supplier
- Click on the company/supplier that the contact belongs to
- Click on the location that the contact belongs to
- Create a new contact in the menu contacts.
Note: If you wish, we can also automate the data import. Please contact us for this.
Administration
General

Employees
To simplify access and setup of the first steps, we recommend giving every employee the role of an administrator. Later, you can always structure the roles the way you need it.
- Wage Type: This is for the link to the payroll accounting. If one has the module time, so the worked hours can be transferred to the accounting.
- Employee Type: It is possible to choose between employee or driver. The employee type is also relevant as soon as it comes to time recording.

Locations
This is important for the later search function for products and refines the search by geographical characteristics. However, you are free on the way you want to use these 3 characteristics, which restricts the search from large to small.
Large: e.g. Country = USA
Medium: e.g Federal States = California, Florida, Texas, etc.
Small: e.g. Cities = Los Angeles, Miami, Dallas, etc.
Again, these are just examples, you can use these 3 characteristics the way it's best for your individual needs. Therefore, it's important to think first about how you want to narrow down the product search for your markets.

Departments
If your organization has different departments, they can be defined here. For each department, you have the possibility to work with cost centre numbers linked to the accounting system. Later when you create companies, suppliers, dossiers (projects) and so on, you will find a mandatory field where you have to assign a predefined department.

VAT
If your organization work with different VAT rates, they can be defined here. It has to be set up a 0 percent VAT. This VAT is used for surcharges which are not VAT relevant.
Later when you create products, offers, etc. or simply manage prices, you will find a mandatory field where you have to assign prices to a predefined VAT.

Company types
Here, individual company types can be entered and later assigned when creating new companies (also suppliers). Company types are helpful for creating reports. You can group your customers for example by "Virtuoso" and see how much turnover, margin, etc. you have generated with these customers.

Account financials
To add pricing, you have to have at least one account financial. These accounts represent the accounts in your accounting system. They are linked by a number. You only have to create the accounts you wish to use.
Sales

Image Categories
This is important for the search function for images. Here, individual image categories can be entered and later assigned when uploading new images. This is helpful for the search/filter function for images.

Images
This is your individual image database. You can upload any image of any size, the system will automatically format it. Just give the image a name and select one of your predefined categories and destinations. Image description is optionally possible.

Product categories
- Product categories are defined by the user.
- Product categories are not the same as product category types. Different product categories can be assigned to product category types.
- Product categories are important for the search function for product templates. Here, individual product categories can be entered and later assigned when creating new product templates. This is helpful for the search/filter function for product templates.

Find more information about creating product categories in the knowledge base.

Product templates
- Products summarize an activity with all its characteristics.
(For example an overnight stay at the Hotel Schweizerhof Lucerne with all the detail information) - Products consist of product templates and subproduct templates.
- The following properties are attached to a product:
- Supplier (Attached to the hotel is the supplier: Hotel Schweizerhof Luzern AG)
- Product category: (Category "5 star hotels")
- Location (Large Switzerland, Medium Lucerne)
- A trip consists of several products. Products are therefore the basis for a trip. Without products, no trips can be created.
- In order to use products, services (main service and/or additional service) have to be assigned.
- Products can be created in the administrator area and can later be added to documents.
Find more information about the product structure and about creating a product template and a subproduct template in the lexicon.

Guide
Here you can manage all your guides. If you have the guides in the database, you can send them a link. There they can enter their availabilities directly. Then you can also book the guide directly from a to-do. See also to-do return values (Type "Guide")
Classic programs
The classic program is a fixed program of product templates. It can be added directly to an offer/confirmation as an entire program without having to add individual product templates. The classic program can be defined over several days.
Dashboards
advatra gives you the ability to personalize your start page, the company overview and also the location overview. You can add new widgets on the three dashboards and order it the way you like by simply drag and drop.
These widgets are controlled by the roles a user have. So it is possible, that one user sees more widgets than another.
- If you first log in into advatra, the system tells you to add a new widget. Just click on the button "Add".
- Then you will see a list of all available widgets. It is good to start with these four: Current trips, To-Do's, Unassigned emails (if you have connected M365) and Events.
- If you are done, just click finish on the bottom left.
If you want to edit the order, add or delete a widget, just click "Customize" on the bottom left.
Just repeat these three easy steps for each dashboard: Start page, company overview, location overview.
Start page
Click on the advatra logo.
We recommend the following widgets:
Unassigned emails, To-do's, Events, Current trips
Company overview
We recommend the following widgets:
E-Mails, To-do's, Location, Files, Documents, Notes, Master data
Location overview
We recommend the following widgets:
E-Mails, To-do's, Location, Files, Documents, Notes, Master data
Sales process
advatra has an implemented sales process from the enquiry to the travel program. You can adapt the process to your own needs.
Let's have a look at dossiers and documents.
Dossiers
A dossier summarize all the information around a trip. You can look at a dossier like a project. A dossier can have different statuses:

Every dossier starts at the status "Inquiry" and moves through until "Finished". With the dossier status, you can get an overview over all pending trips from your company.
Documents
Every dossier contains different documents. We differentiate between "Travel" and "Financial" documents. All the financial documents have an impact on your accounting. The travel documents holds data about the trip itself (trip dates, travellers, and so on).

All together
Now, let's have a look at the combination of the dossiers and documents and when they are created.
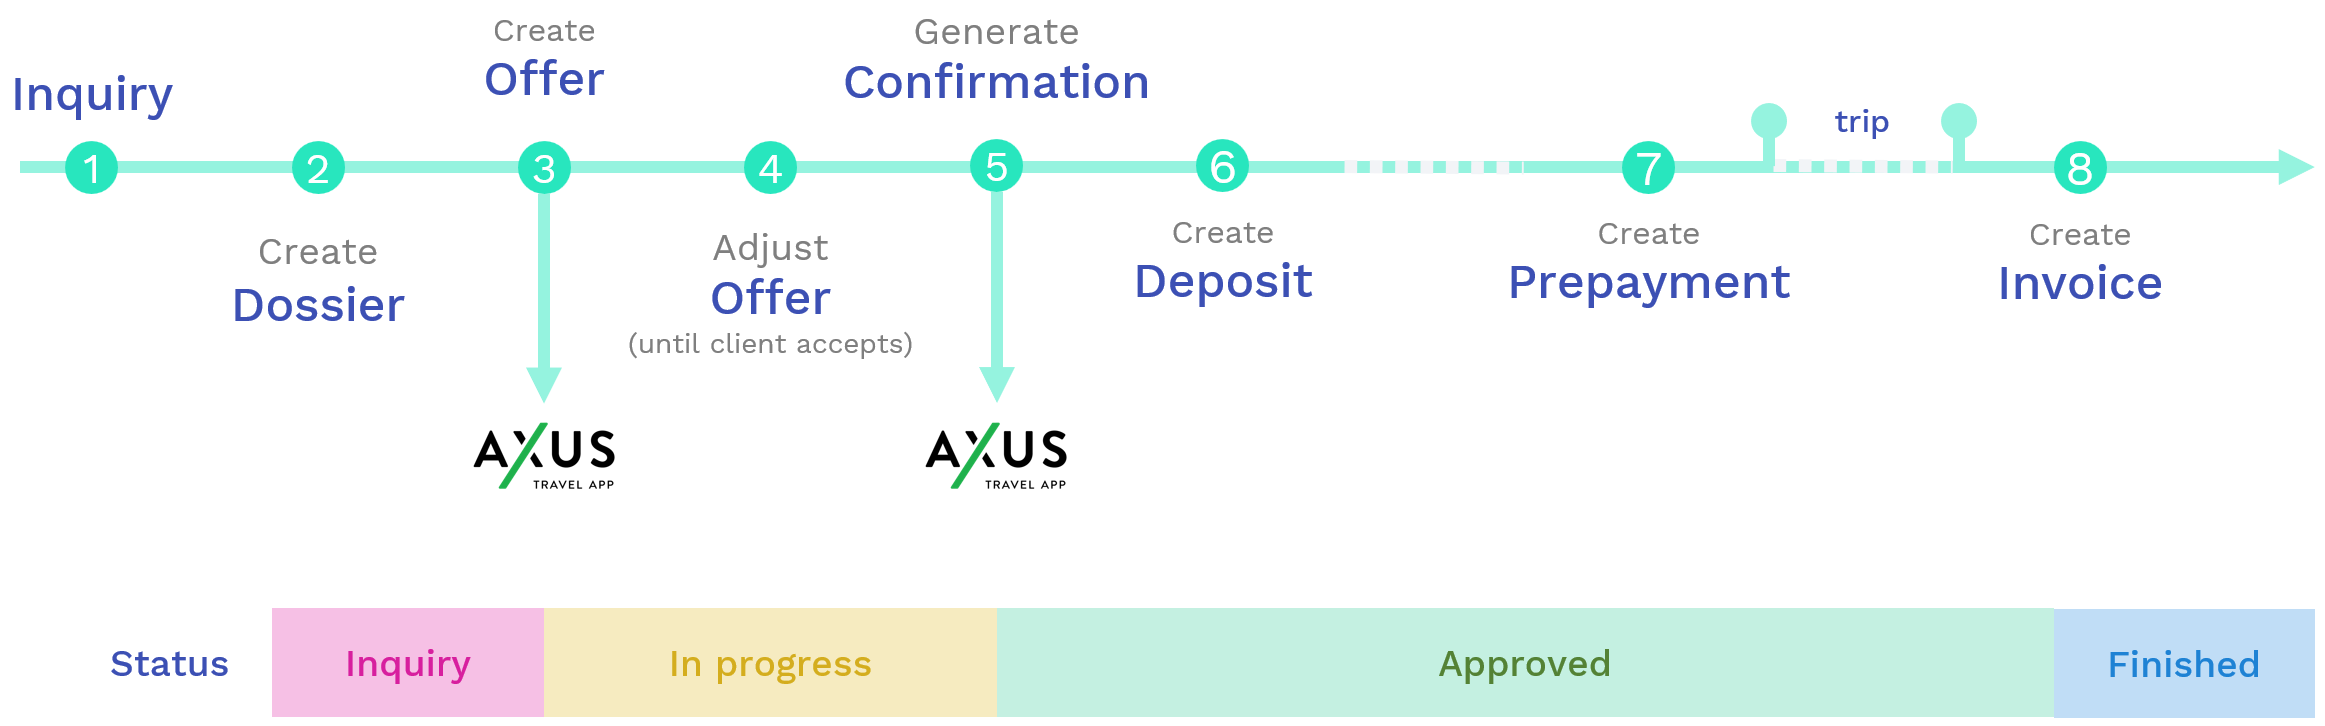
- You receive a request from a travel agent of the Brownell Travel Agency in Birmingham.
- A dossier is created with the status "Inquiry":
- Company: Brownell Travel Agency
- Location: Brownell Travel, Birmingham
- As soon as you have all information together, an offer is created in the dossier and the status is updated to "In Progress".
The offer can be sent as Word, PDF or AXUS export to the travel agent. - You can always adjust the offer until it is approved by the travel agent and his travellers.
- As soon as you receive the confirmation that everything fits, the offer is converted into a confirmation.
At the same time, the status of the dossier changes from "In Progress" to "Approved". - The Traveller pays a deposit (for example, 25% of the total price of the trip).
- The remaining 75% must then be paid 1 month before the start of the trip.
- After the trip has taken place, the deposit and prepayment have already been synced to the accounting system.
Now you can create an invoice, deduct the deposit and prepayment and check whether everything has been paid.
If your travellers have received additional benefits during the trip:
You can always add this or every change to the confirmation. In the end (while generating the invoice) advatra tells you, if your client has to pay anything extra.